




LINE Basics: How to Set Up a LINE Rich Menu
The rich menu is the storefront of your LINE Official Account and one of its most important features. When friends open a chat with your account, it can drive traffic to your brand website and serve as the entry point for online campaigns. So how do you set one up in the LINE Official Account Manager?
 Khan LeeCTO
Last time, we explained what a LINE rich menu is. When friends open a chat with your LINE Official Account, the rich menu is the first thing they see. We believe a good rich menu can drive customers to your brand website, serve as the entry point for online campaigns, and build a strong brand image.
So how do you actually set up a rich menu in the LINE Official Account Manager? Follow the steps below to create one in the LINE Official Account Manager web dashboard!
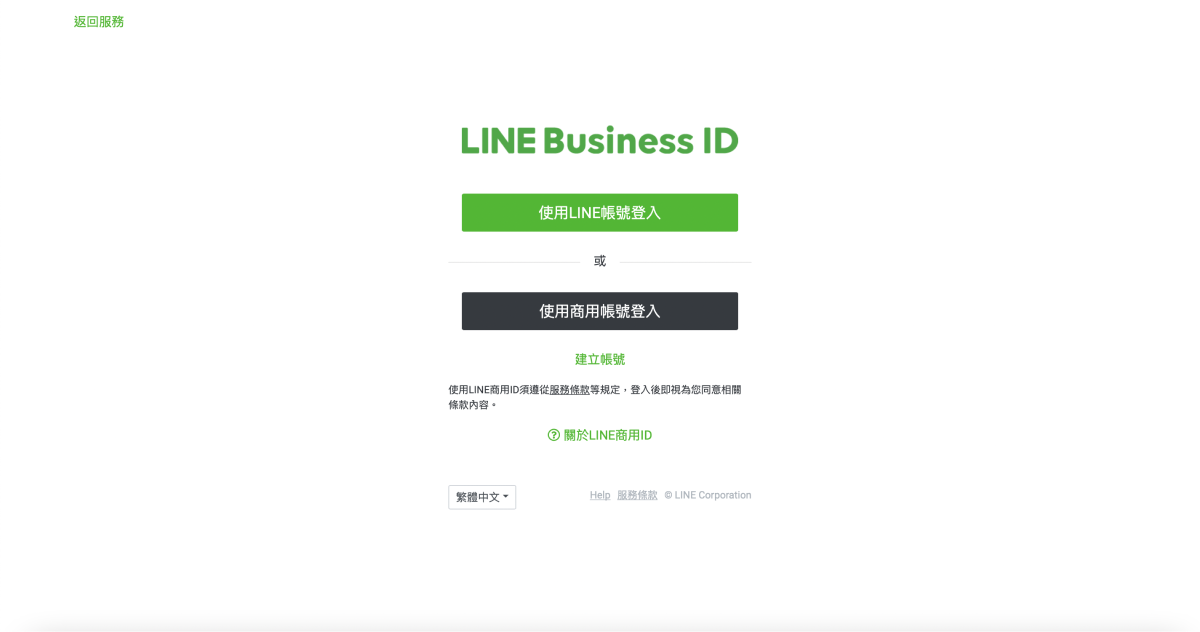
Sign in to the LINE Official Account you want to set up
- First, sign in with your LINE Business ID.
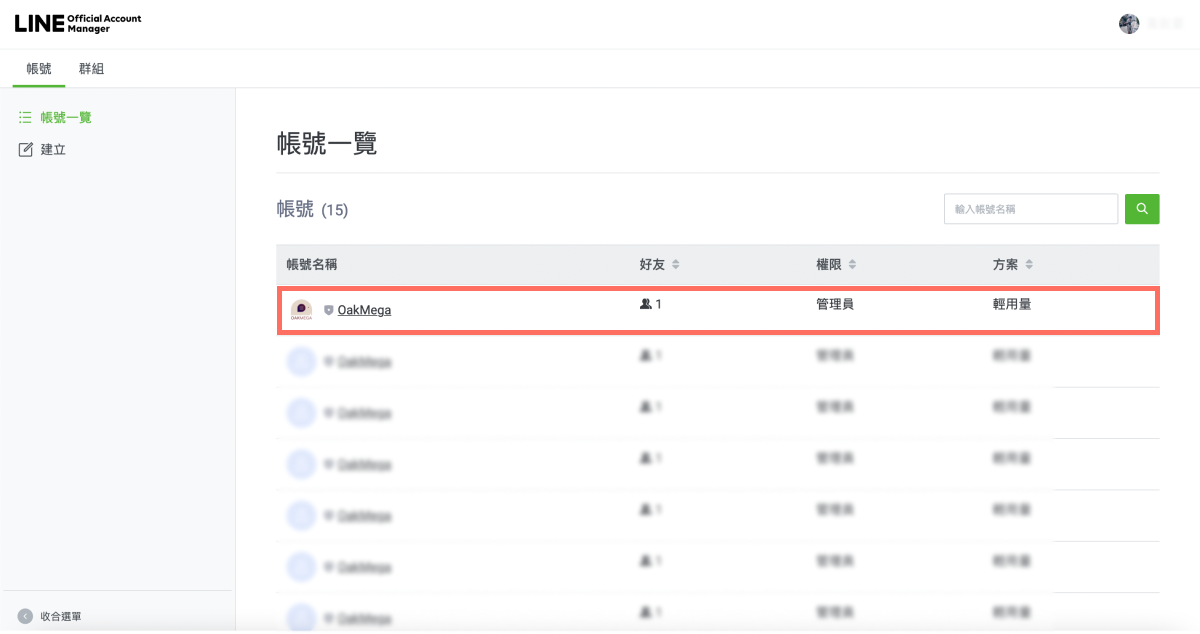
- Once signed in, choose the LINE Official Account you want to set up a rich menu for from the account list.
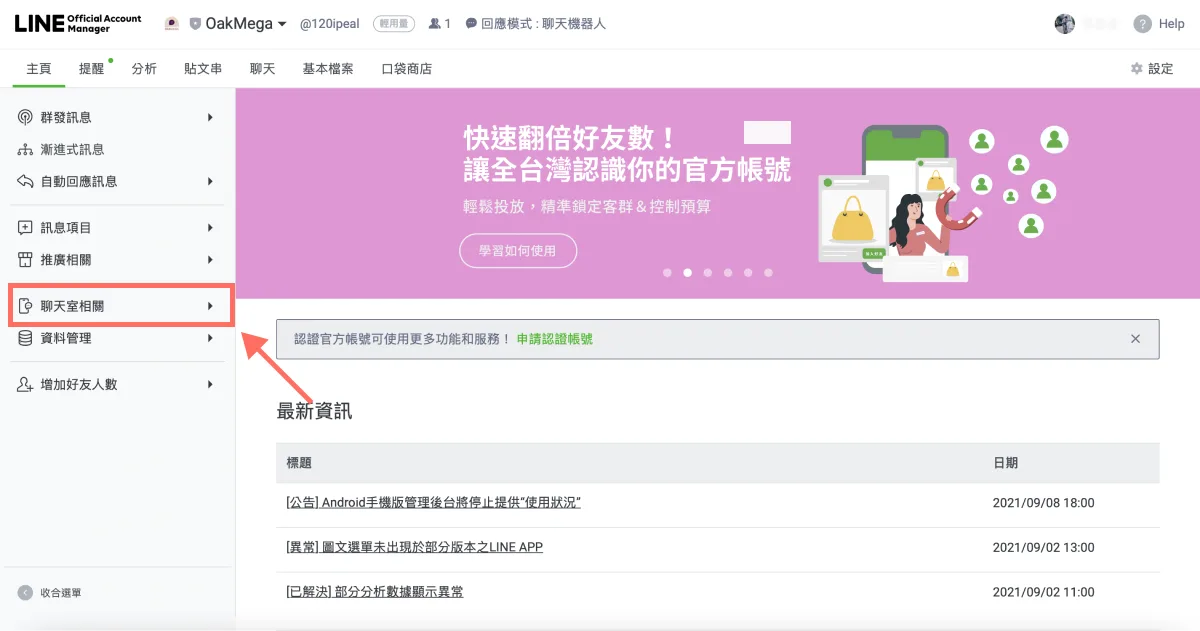
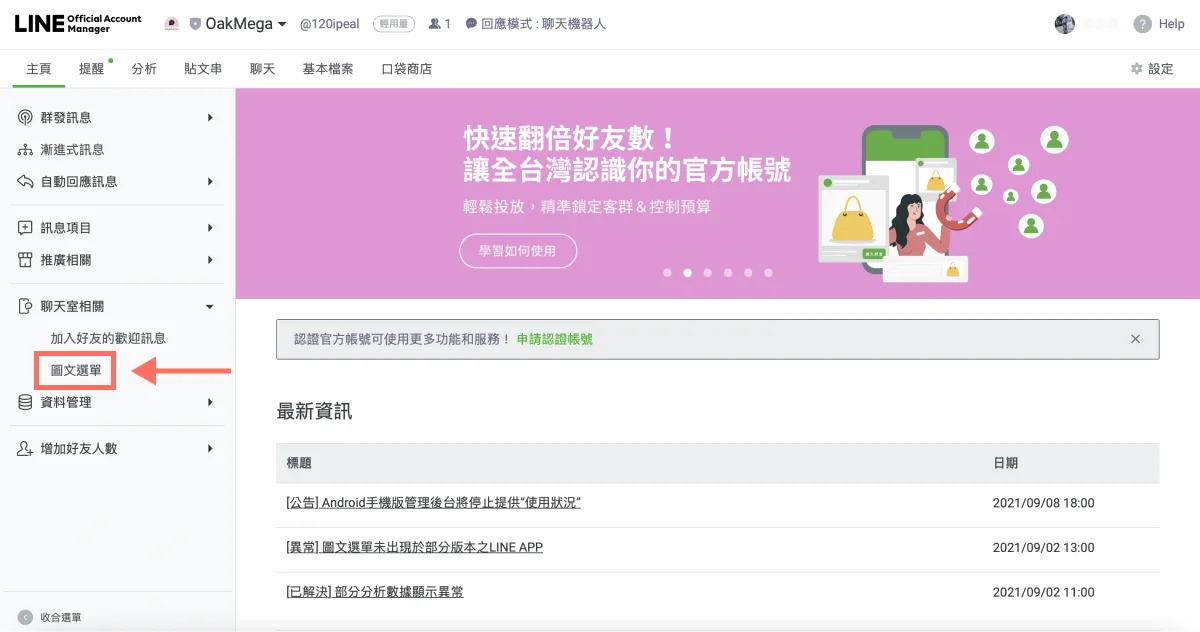
- In the left-hand menu, expand “Chat-related” and click “Rich menus.”
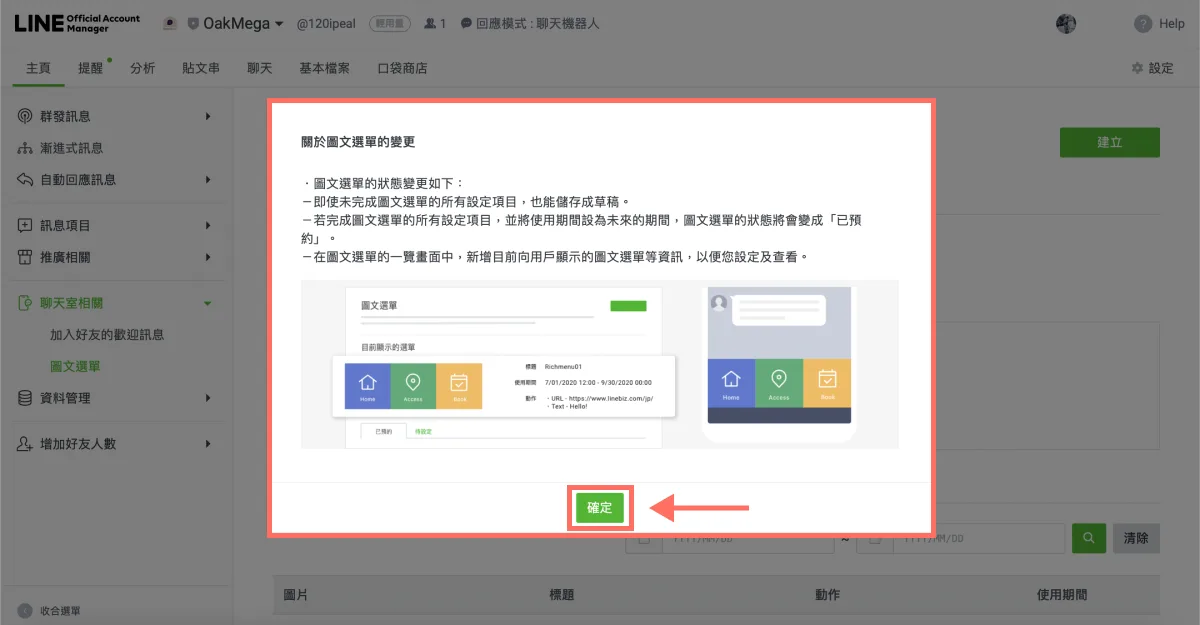
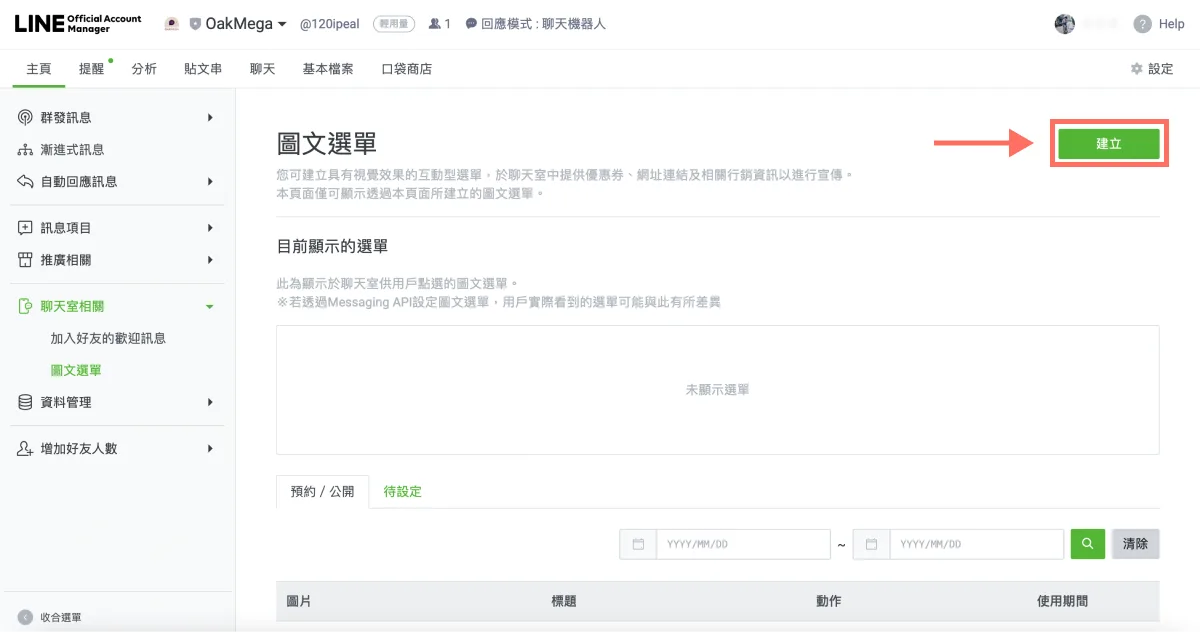
- The first time you open the rich menu page, a notice will pop up. Click “OK” to close it. Then click “Create” in the top-right corner to build your first rich menu!
Create your LINE rich menu: Display settings
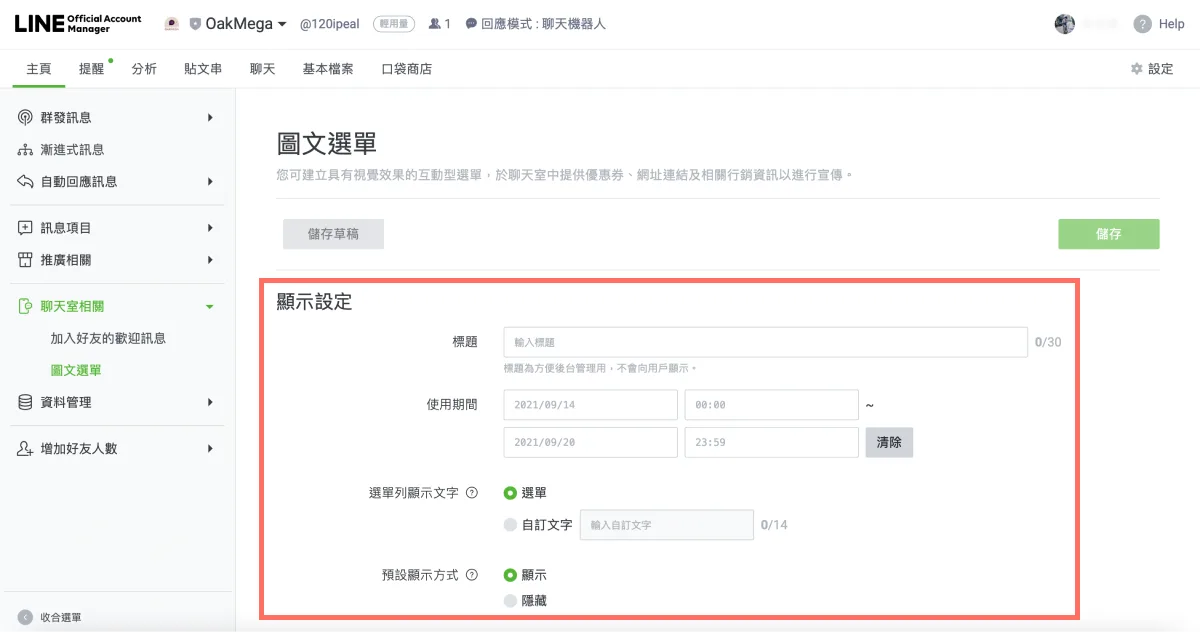
- To create a rich menu, fill in the following four fields:
- Title: Enter “My first rich menu” (the title is for internal management only and isn't shown to friends).
- Display period: Choose a date range. We recommend today through the same date next year (click “Clear” to reset the dates).
- Menu bar label: The text shown at the bottom of the chat. We recommend selecting “Custom text” and entering something like “{Company name} welcomes you,” e.g. “OakMega welcomes you” (up to 14 characters).
- Default behavior: Select “Show” so the rich menu appears when friends chat with your official account.
Set up your LINE rich menu: Content settings
- After finishing the display settings, scroll down to the content settings.
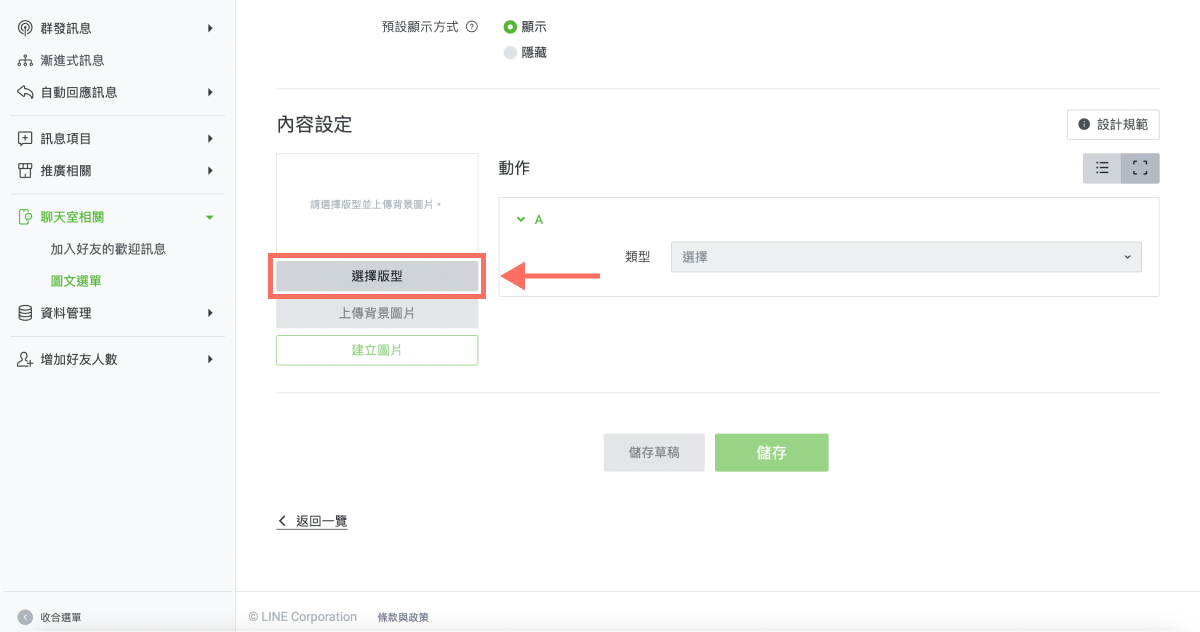
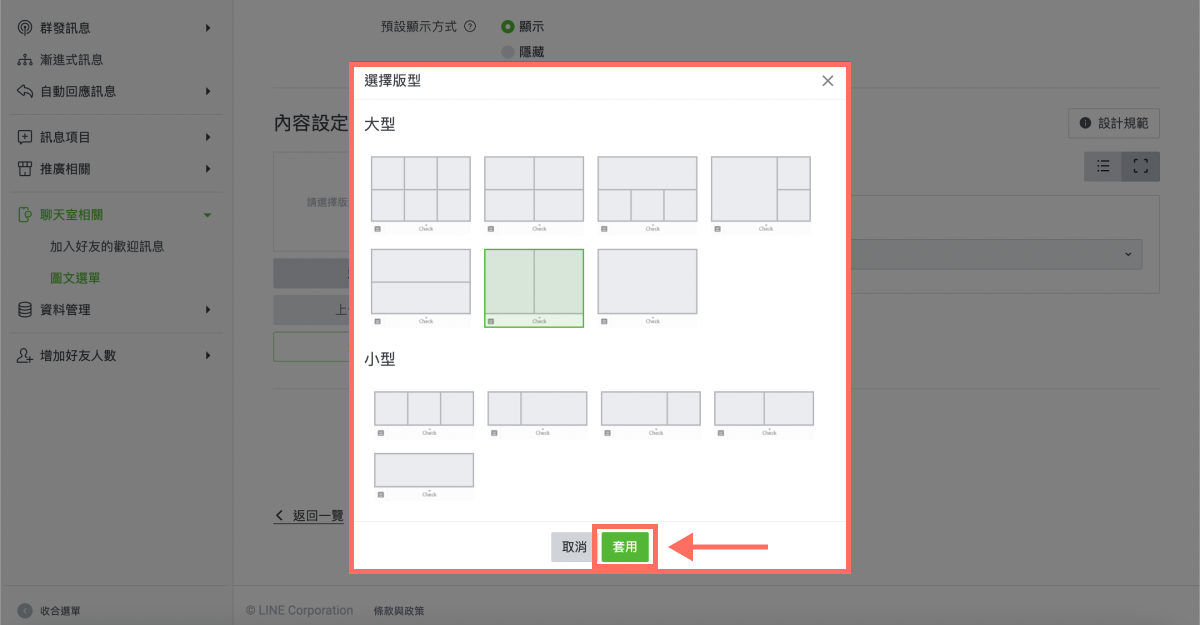
Click “Select a template.” You can design your rich menu image to fit the template you need. LINE offers two categories, large and compact; here we'll use the large template split into left and right halves. Once you've chosen a template, click “Apply.”
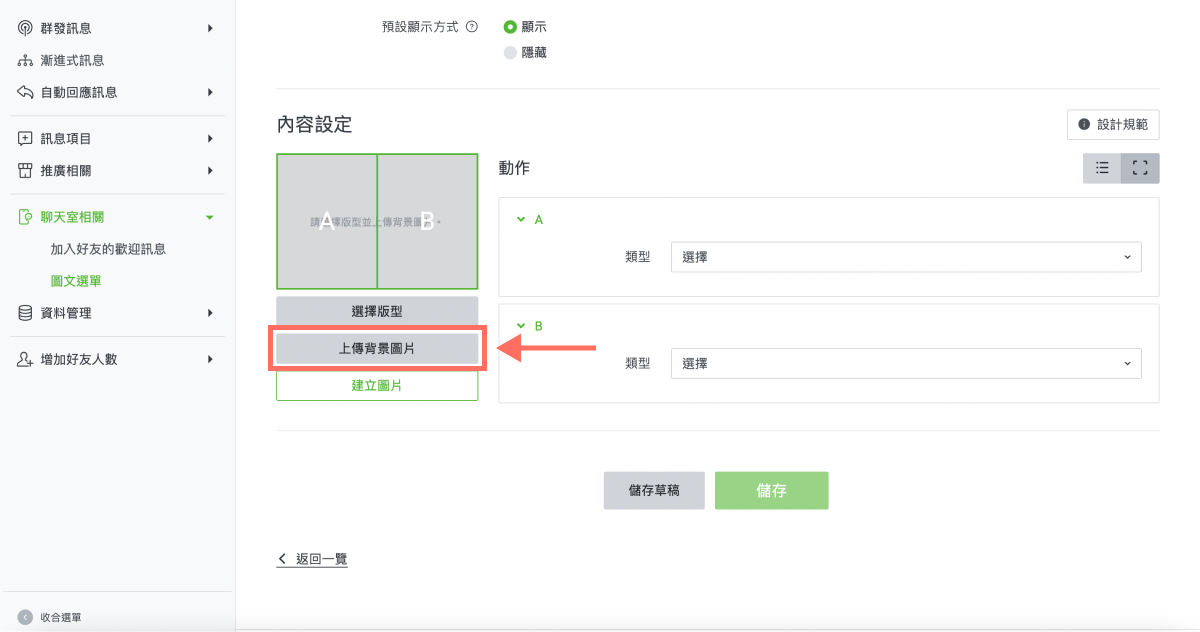
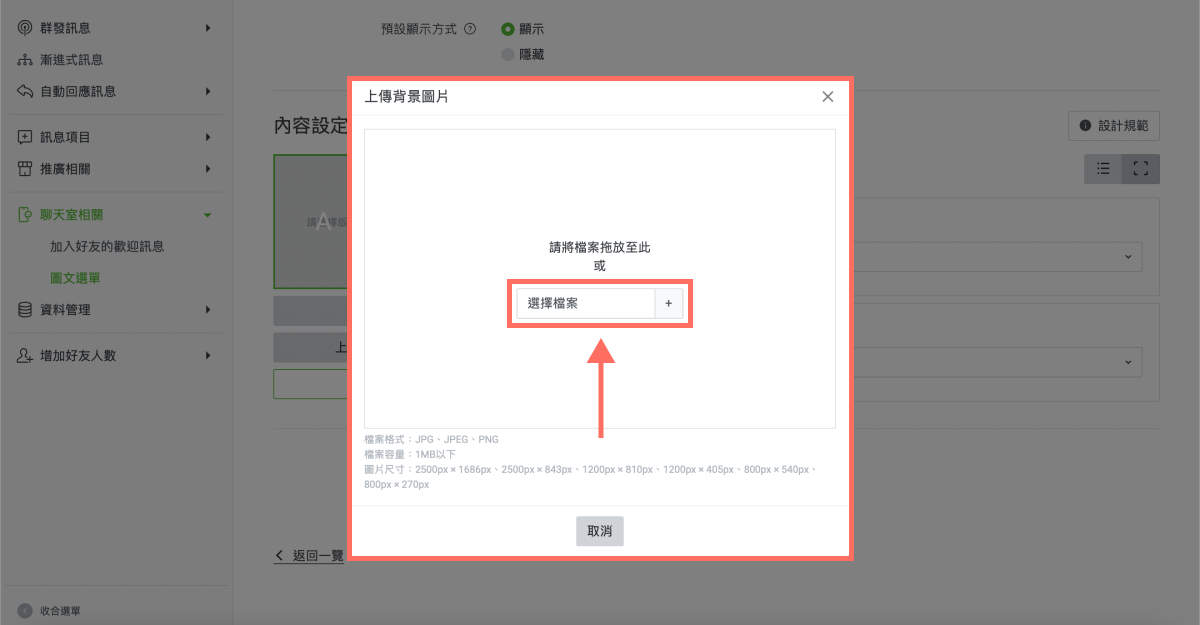
- Next, click “Upload background image” and upload a photo for your rich menu. You can also drag and drop the file into the middle of the screen.
Make sure the format, file size, and dimensions meet the requirements below, or the upload will keep failing!
- Format: JPG, JPEG, PNG.
- File size: 1 MB or less.
- Image dimensions: six options — 2500px x 1786px, 2500px x 843px, 1200px x 810px, 1200 x 405px, 800px x 540px, 800px x 270px.
Feeling a little dizzy? Don't worry. Once you set up the image actions, your first rich menu is done!
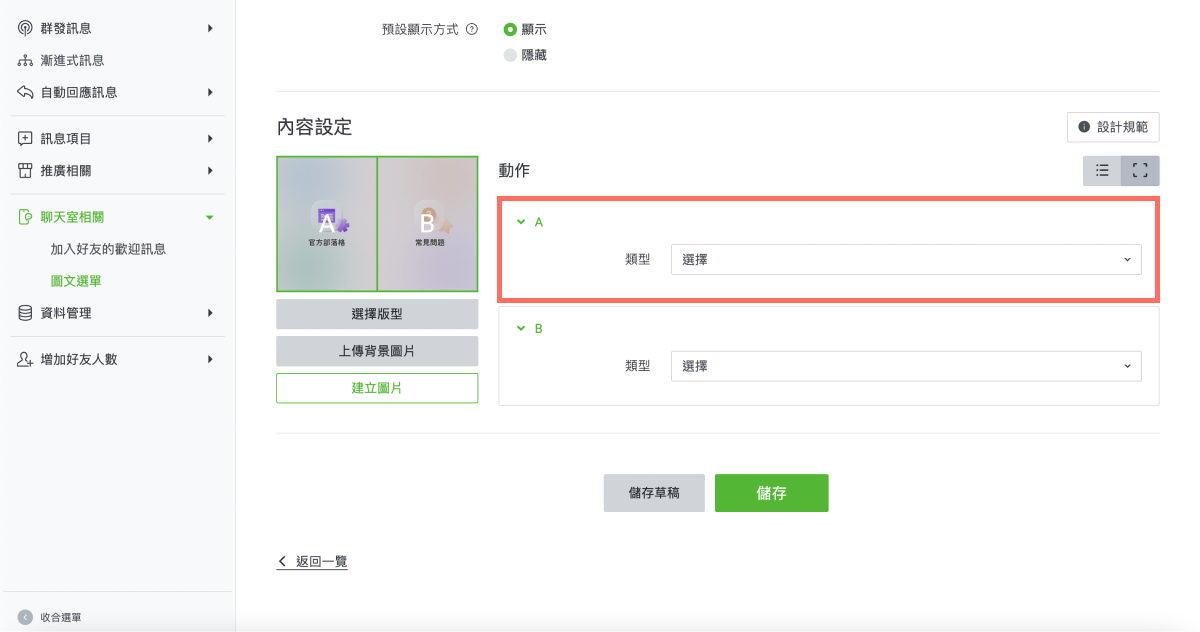
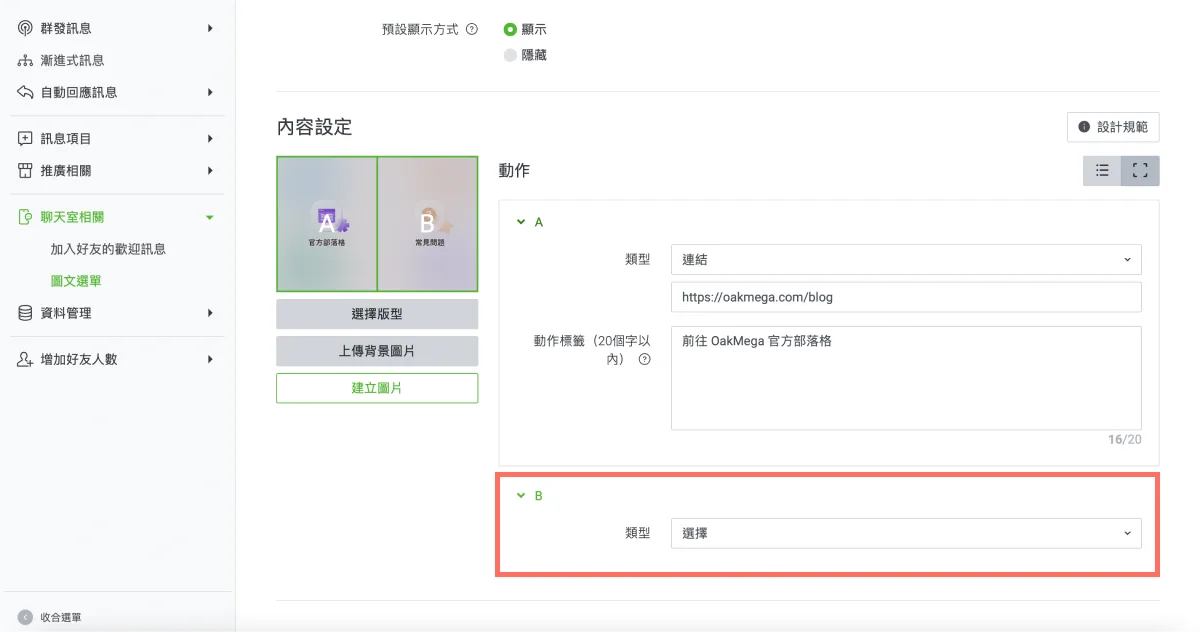
- After uploading the background image, set up actions under “Action” on the right, based on the template you chose. First, for area A, choose the “Link” type from the dropdown, paste the URL you want to send traffic to (such as your company website or blog), then fill in the action label, which is used as preview text (up to 20 characters).
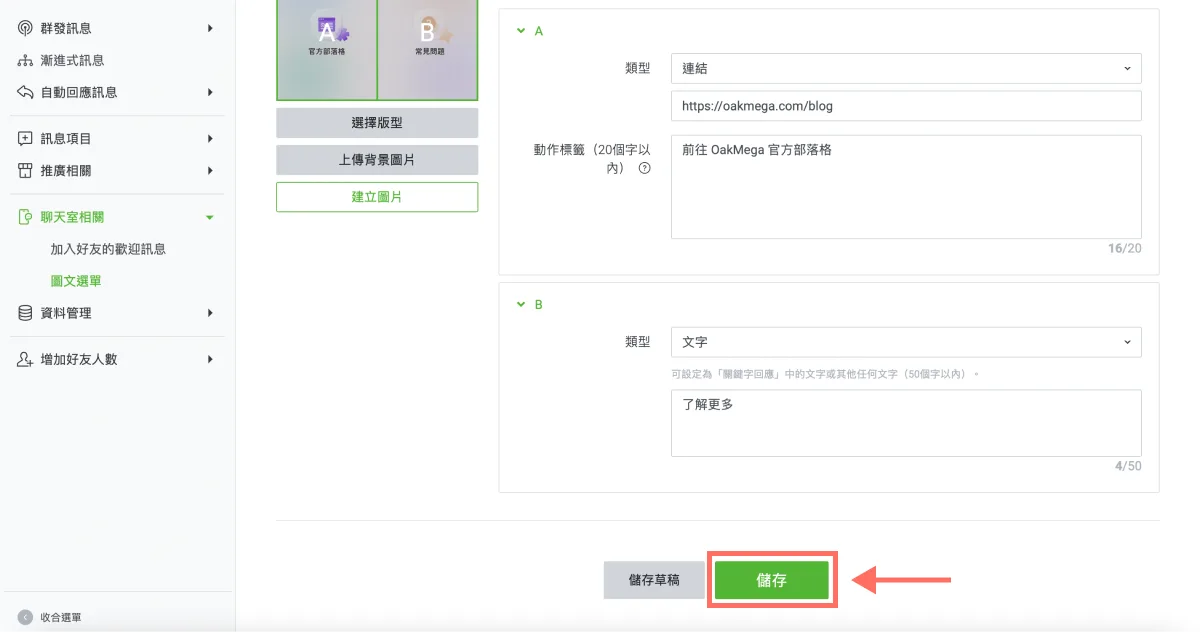
Next, for area B, choose the “Text” type from the dropdown and enter “Learn more” as the keyword response (up to 50 characters).
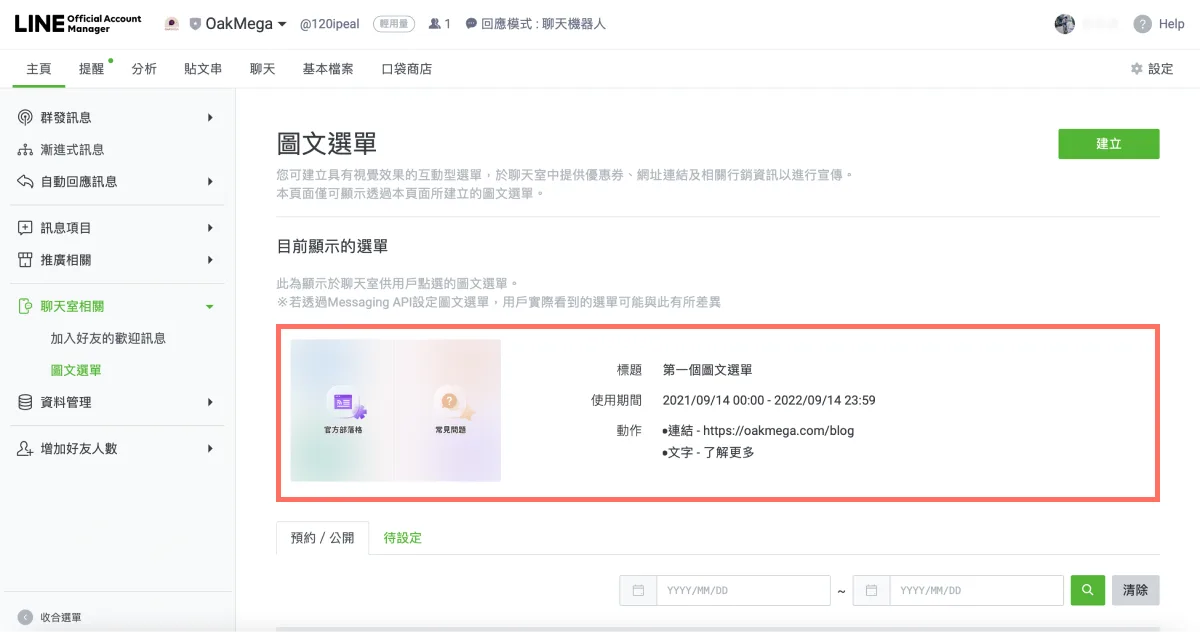
- If you've made it this far, congratulations — there's just one step left. Click “Save” at the bottom of the screen and your rich menu is set up! Pretty easy, right? You'll be taken back to the rich menu page, where you can see the rich menu you just created.
Rich menu FAQ
We've also rounded up common rich menu questions from users who are just getting started with a LINE Official Account:
Q1: Can I set up multiple rich menus?
A: Yes! Keep clicking “Create” on the rich menu management page to build as many kinds of rich menus as you like. Just make sure their display periods don't overlap.
Q2: What are the coupon and reward card options in the action types?
A: Stay tuned for our upcoming tutorials, where we'll answer this question. A quick hint: paired with the right marketing strategy, coupons and reward cards can be a real asset for businesses!
Q3: Why doesn't anything happen when friends tap my “Learn more”?
A: Because you haven't built your first chatbot yet! Stay tuned to the “OakMega LINE Playbook” — we'll answer this question there!
Q4: Can I create custom templates or switch between rich menus at any time?
A: Unfortunately, neither is currently possible in the LINE Official Account Manager. But with OakMega Social CRM's free plan, you can do both in a single click!
Now that you know how to set up a LINE rich menu, doesn't it seem easy? Want to learn more about running a LINE account? Wondering how other brands get so creative with their rich menus? Visit the OakMega LINE Official Account for more LINE tips, or follow our “OakMega LINE Playbook,” a from-scratch guide to building your brand's LINE Official Account.